So, you've installed your wheel spacers, and your car looks like it's begging to hit the road. But hold on—there’s more to do before you drive off into the sunset. Making sure everything is good to go post-installation is just as important as the install itself.
First things first, inspect your work. Did you tighten everything correctly? Going through each wheel, ensure the spacers sit flush with the hub. Flushing out any gaps can prevent annoying and potentially harmful vibrations down the track. Tightening the nuts with a torque wrench is a must—just cranking them with a regular wrench can lead to over-tightening or, worse, loose fittings.
Once you're confident everything's secure, it's time for a quick road test. Start slow and get a feel for the ride. Listen for any odd noises or vibrations that weren't there before. If anything feels off, head back to the garage. It's better to make adjustments now than dealing with problems when you're farther from home.
- Immediate Checks
- Road Testing
- Tightening the Nuts
- Inspecting for Wear
- Alignment Considerations
- Regular Maintenance
Immediate Checks
Alright, you've finished the installation, but the job’s not complete just yet. Before you rev the engine, it’s crucial to perform a few immediate checks to ensure your wheel spacers are set up correctly. These checks could save you from potential problems later.
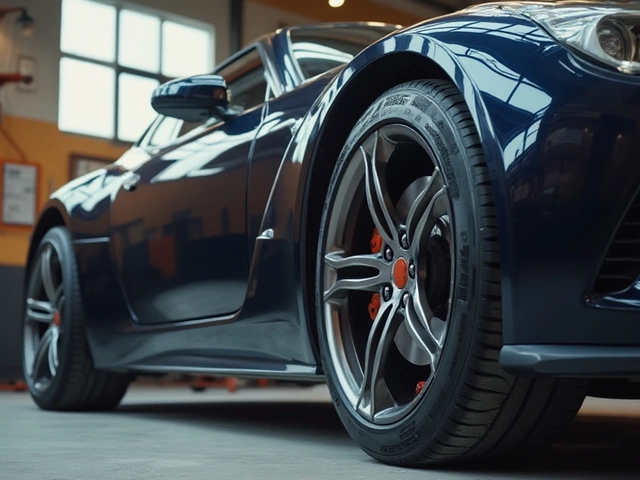
Spacer Fit
First, confirm that each spacer sits perfectly flush against the hub. Even the smallest gap can lead to vibration while driving. Use a feeler gauge if you need to measure any minor gaps.
Torque Settings
Next, grab a torque wrench and make sure those lug nuts are tightened to the right specifications. Refer to your vehicle's manual or spacer instructions for the correct torque values. A typical mid-size car might require around 80 to 100 lb-ft, but this can vary.
- Start by tightening each nut in a crisscross pattern—always the safest bet to get even pressure across the spacer.
- Double-check each nut; it's better safe than sorry.
Stud Length
Another quick check is to ensure that the wheel studs are the right length. They need to grip the lug nut threads, but not be so long that they interfere with the wheel installation. Ideally, you'll want at least six to eight full turns of the lug nut.
Clearance Checks
Now, let's look at clearance. Make sure there's enough space between the car's fender and the tires. A good rule of thumb is having at least a couple of centimeters. Otherwise, you might be facing rubbing issues while making turns or during bumpy rides.
| Check Point | Action Required |
|---|---|
| Spacer Fit | Ensure zero gaps |
| Torque Settings | Verify with a torque wrench |
| Stud Length | Confirm proper thread engagement |
| Clearance | Check tire to fender space |
Performing these immediate checks can set you on the right path and make sure your drive is smooth and safe.
Road Testing
Great, you've given your car the visual boost with those wheel spacers. But don't hit the highway just yet—it's time for a crucial road test to make sure everything is performing as it should. This phase can give you peace of mind and help identify any potential issues early.
Start the road test by driving slowly within your neighborhood or a quiet street. Keep your ears open for any strange sounds, like rattles or hums. Notice if your steering feels different or if there are new vibrations. These could signal that spacers aren't sitting right or the lugs need more tightening.
Straight Line Stability
Begin by assessing straight line stability. As you cruise, does the car drift to one side? If it does, it could be a sign of a misalignment introduced by the spacers. Any roaming might mean it’s time for an alignment check.
Cornering Feel
Next, pay close attention to how your vehicle behaves in corners. Are you feeling more confident turning thanks to that improved stance and stability? Car modification lovers swear that handling improves, but you want to make sure it aligns with your expectations.
Try braking in a controlled, predictable manner. Notice if there’s any irregular feedback through the brake pedal. Unusual sensations might indicate uneven pressure distribution.
Check on Wear and Tear
After a short drive, make a visual check on your tires and spacers. Are the tires wearing evenly? Uneven wear might suggest a wheel alignment issue or improper installation. Make sure the vehicle safety isn't compromised by keeping tabs on these small details.
Doing these checks isn't just about ensuring performance; it's about keeping you safe out there. Being attentive during this road test can prevent long-term issues and keep your ride smooth and steady. After all, installation tips are about more than just getting it right the first time; it's about keeping it right.
Tightening the Nuts
Believe it or not, tightening the nuts is one of the most critical steps after your wheel spacer installation. You might be tempted to just use a standard wrench, but it's crucial to get yourself a torque wrench. This tool ensures you're applying the exact amount of torque needed, preventing issues like warped rotors or loose wheels.
Here's a step-by-step guide:
- Select the Correct Torque: Check your vehicle's manual or the guidelines that came with your wheel spacers. You'll find specific torque specifications there. Stick to them religiously.
- Use a Star Pattern: When tightening the lug nuts, adopt a star pattern. Tighten one nut, then move across the wheel to the opposite nut. This ensures even pressure across the wheel.
- Incremental Tightening: Don't go full force in one go. Start with half the recommended torque, and once all nuts are tightened, increase to the full torque level. This staggered approach keeps everything balanced.
- Double-Check: Trust, but verify. Once you’ve gone around the wheel once, do it again. Ensuring all nuts are consistently tightened can prevent a wobble road experience.
Once you've tightened everything up, take it for a spin. Notice any vibrations? If so, head back for another check because driving with loose lug nuts could lead to disaster.
Common Mistakes
One frequent mistake is over-tightening. It might seem harmless, but it can damage your wheel hubs or even the wheel spacers themselves. Also, relying on a 'feel' method—thinking you can tell by feel if it's tight enough—is another common pitfall. Always use the torque specs provided.
By taking these precautions seriously, you're not just protecting your car modification investment but also ensuring the overall vehicle safety for you and your passengers.
In case you're curious about the exact torque settings for different car models, here's a quick reference table:
| Car Model | Recommended Torque (Nm) |
|---|---|
| Toyota Camry | 103 |
| Ford Mustang | 135 |
| Honda Civic | 108 |

Inspecting for Wear
After you've taken that smooth drive with your new wheel spacers, it's time to dive into routine checks for wear. Keeping tabs on the wear and tear not only ensures your ride stays comfy but also safe.
The Importance of Regular Inspections
Even the best-installed spacers can show signs of wear over time. Road conditions, aggressive driving, or simple everyday use can affect them. Regularly checking your spacers helps catch issues early, saving you from nasty surprises.
Signs of Wear
- Visible Cracks or Deformities: Any cracks or bending in the spacers means it's time for a change. These can compromise your vehicle's safety.
- Uneven Tire Wear: Spacers can sometimes cause misalignment. Keep an eye on your tires. Unequal wear patterns could signal the spacers need an adjustment.
- Corrosion or Rust: Rust can weaken metal over time. Ensure your spacers aren't rusting, especially if you live in areas with harsh weather.
How to Inspect
- Lift the vehicle on a jack, making sure it's secure before beginning.
- Remove the wheels to gain clear access to the spacers.
- Visually inspect each spacer closely for any damage or wear.
- If you find any issues, it's best to consult with a professional before carrying on driving the vehicle.
When to Replace
If you're spotting any of the signs above or something just feels off, consider replacing your spacers. Regular checks every 3,000-5,000 miles can catch these issues early.
| Check Frequency | Action |
|---|---|
| Initial Installation | Inspect after 50-100 miles |
| Regular Use | Check every 3,000-5,000 miles |
Keeping up with these inspections will ensure your car stays in top shape and that your wheel spacers continue to provide the benefits you're seeking.
Alignment Considerations
After popping those wheel spacers onto your ride, don't overlook the alignment. It might not seem like a big deal, but wheel spacers change the geometry of your setup. This can affect how your car handles, more than you'd expect.
So what's the deal with alignment? When you install spacers, your wheels get pushed out from the hub. This widening can alter your car's natural alignment, impacting everything from steering responsiveness to tire wear. If you're noticing your steering wheel isn't quite centered or your vehicle pulls to one side—an alignment check should be on your to-do list.
The Alignment Process
Getting your wheels aligned doesn't mean just eyeballing things in your garage. It's about precision. Take it to a pro who'll make sure your wheels are adjusted to the manufacturer's specified angles. Here's what generally happens:
- Inspection: They start with checking tire wear patterns and suspension components for any damage.
- Adjustment: Using an alignment machine, angles like camber, toe, and caster are adjusted.
- Testing: After adjustments, they might do a test drive to ensure everything’s dialed in perfectly.
Keeping things aligned after adding wheel spacers might seem like a hassle, but it makes a world of difference not just in terms of drivability, but also on how long your tires will survive.
Wondering about stats? Here's a quick look at what alignment factors generally affect:
| Factor | Effect |
|---|---|
| Camber | Impacts tire wear and cornering performance. |
| Toe | Poor straight-line tracking and quick tire wear. |
| Caster | Steering feel and directional stability. |
All these minor tweaks add up to a smoother drive. If you've gone with a more aggressive spacer setup, regular checks on your alignment could save you a fair bit of cash in the long run—from tires to suspension bits, a little preventative care goes a long way.
Regular Maintenance
Alright, so you've got your wheel spacers fitted and you’re riding smooth, but how do you make sure they keep performing well? Regular maintenance isn't just for old cars; it's a must for any vehicle with modifications like wheel spacers.
Why Maintenance Matters
Just like how you wouldn't skip an oil change, keeping an eye on your wheel spacers can save you from future hassles. It’s crucial to regularly inspect them to ensure they're in top shape. You don’t want to end up with uneven tire wear or worse, a compromised ride.
Inspection Checklist
Here's a simple checklist to keep your vehicle running at its best:
- Torque Check: Dealing with loosening? Re-tighten the bolts to the manufacturer’s specs every month.
- Visual Inspection: Look for cracks or damage each time you wash your car. It’s a good habit!
- Tire Alignment: Alignment can drift. Check it regularly to avoid damaging your suspension.
- Rust Watch: Even the slightest rusting can lead to major issues. Stay alert and address it ASAP.
According to automotive expert Steve Clarkson,
“Regular checks can help catch any potential defects early on. It’s not just about looking good; safety matters.”
Maintaining the Stock
If you’ve got a couple of spare wheel spacers lying around, take a look at them every so often. Keeping extras in good condition means you'll have replacements ready whenever you need them.
Using Professional Services
If you know when something's wrong but can't pinpoint it, trust the pros at your local garage. They can help diagnose and fix issues with your wheel spacers, ensuring your safety and maintaining the lifespan of your modifications.
Incorporating regular maintenance into your routine ensures that your ride stays not only safe but continues to perform at its best. After all, who doesn’t want their car to feel new long after the spacers are installed?