Wheel Spacer Calculator
Vehicle Configuration
Ever look at a car with wide tires that seem to hug the fenders just right, and wonder how they got that look? It’s not always a custom body kit or lowered suspension. More often than not, it’s something simple - wheel spacers. These small metal or aluminum rings sit between the wheel and the hub, pushing the wheel outward. But what do they actually do beyond making a car look wider?
They Move the Wheel Outward - Simple as That
At its core, a wheel spacer does one thing: it increases the distance between the wheel and the hub. Think of it like adding a thick washer between your foot and the pedal. The wheel doesn’t change. The tire doesn’t change. But now, the entire assembly sits farther out from the car’s body.
This is especially useful when you’ve upgraded to wider wheels or tires. Factory wheels often have a high positive offset - meaning they sit tucked inward under the fender. When you swap them for aftermarket wheels with less offset, the tires can rub against the suspension, brake calipers, or inner fender liner. Spacers fix that by pushing the wheel out far enough to clear everything.
It’s not just about clearance. Spacers also help with aesthetics. Many people want that aggressive, flush look where the tire sits even with the fender. Without spacers, wide wheels can look sunken in, like they’re hiding under the car. Spacers give them room to breathe.
They Improve Handling - But Not Always the Way You Think
One common myth is that wheel spacers make your car handle better. That’s not exactly true. Spacers don’t improve grip or cornering force by themselves. What they can do is widen the track width - the distance between the left and right wheels.
A wider track improves stability, especially at high speeds or during quick lane changes. It reduces body roll slightly because the weight is distributed over a broader base. Think of it like standing with your feet shoulder-width apart versus feet together - you’re more balanced.
But here’s the catch: adding too much width can hurt handling. If you go over 15mm per side, you increase stress on the wheel bearings, hub assembly, and suspension components. The steering can feel heavier, and your tires may wear unevenly if alignment isn’t adjusted. Most street cars run fine with 5-12mm spacers. Beyond that, you’re entering track or show territory.
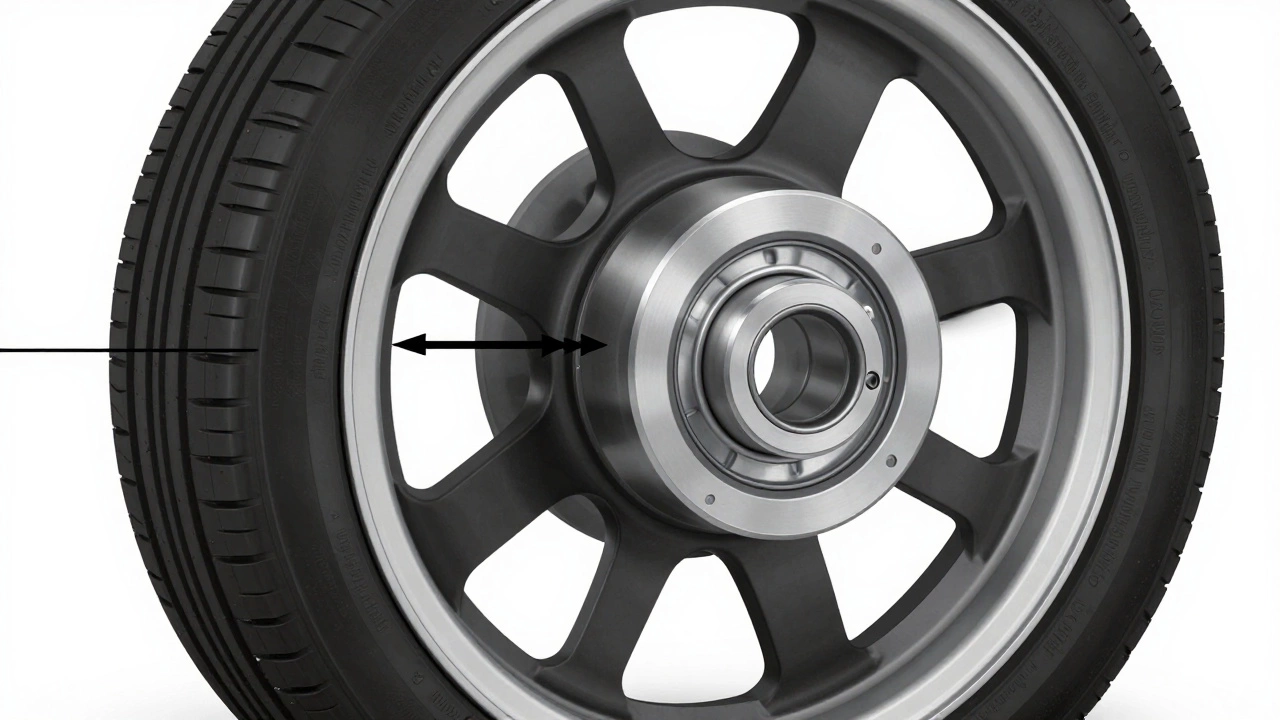
Hub-Centric vs. Bolt-On: Which One Should You Use?
Not all spacers are made the same. There are two main types: hub-centric and bolt-on.
Hub-centric spacers have a center bore that matches your car’s hub exactly. When you install them, the hub takes the weight of the car, not the lug bolts. This reduces vibration and keeps the wheel centered. These are the only type you should use on daily drivers. Brands like H&R, ECS Tuning, and RacerX make quality hub-centric spacers with precise tolerances.
Bolt-on spacers (sometimes called “slip-on”) rely entirely on the lug bolts to hold everything in place. They’re cheaper, but they’re also risky. Over time, the bolts can loosen, the spacer can wobble, and you get dangerous vibrations. You’ll see these on budget kits sold on Amazon or eBay. Avoid them unless you’re only using them for a one-day show.
Always check that the spacer’s center bore matches your hub size. A 66.5mm hub needs a 66.5mm bore. If it’s too big, the spacer wobbles. If it’s too small, it won’t fit at all.
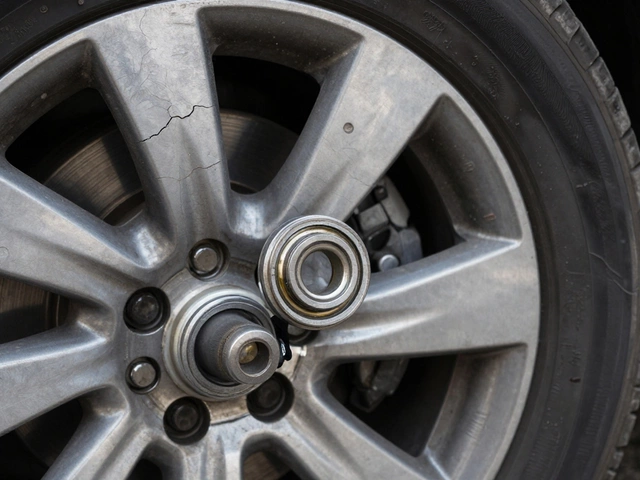
Do Spacers Affect Wheel Bearings?
This is the biggest concern people have. Yes, spacers increase the load on the wheel bearings - but only if they’re too thick or poorly installed.
Here’s how it works: when you add a spacer, you’re extending the distance between the bearing and the point where the tire pushes sideways during cornering. That creates more leverage. Think of it like holding a heavy object with your arm straight out - it’s harder than holding it close to your body.
Studies from the Society of Automotive Engineers show that spacers over 15mm can increase bearing load by up to 40%. That doesn’t mean they’ll fail immediately. Modern bearings are strong. But if you’re already running worn bearings, or you’re driving aggressively, or you’re on rough roads, that extra stress adds up.
Rule of thumb: if your car has over 80,000 miles and you’re considering 15mm+ spacers, replace the bearings first. If you’re under 50,000 miles with stock suspension, 10mm spacers are generally safe.
Are Wheel Spacers Legal?
Legality depends on where you live. In the U.S., most states don’t have specific laws against spacers - but they do have rules about tire protrusion.
If your tire sticks out past the fender, you could get cited for an unsafe vehicle modification. Some states require fender flares if the tire extends more than 1 inch beyond the body. Others require you to cover the exposed tire with a mud flap.
In Europe, regulations are stricter. The EU requires all modifications to be certified under ECE R30 or ECE R124. Most off-the-shelf spacers don’t carry this certification. So while you can install them, you might fail your next TÜV or MOT inspection.
Always check your local vehicle code. And if you’re planning to drive on public roads, err on the side of caution. Stick to 10mm or less unless you’re ready to modify fenders or install flares.
Spacers vs. Wide-Offset Wheels: Which Is Better?
You might be wondering: why not just buy wheels with the right offset instead of using spacers?
Good question. Buying wheels with the correct offset is the ideal solution. It’s cleaner, safer, and lighter. But it’s also more expensive. A set of 18-inch wheels with the right offset can cost $1,200-$2,500. A set of 12mm spacers? Around $150-$250.
Spacers are a budget-friendly way to test a look before committing. Many people install 8mm spacers to see if they like the stance. If they love it, they then sell their old wheels and buy new ones with the right offset.
Also, spacers let you keep your original wheels. That’s useful if you’re renting a car, leasing, or plan to sell later. You can remove them and restore the factory setup without losing your investment.

Installation Tips - Don’t Skip This Part
Installing spacers isn’t hard, but doing it wrong can be dangerous.
- Always use a torque wrench. Tighten lug nuts to the manufacturer’s spec - never guess.
- Use thread locker on the bolts if the spacer has its own bolts (hub-centric ones usually don’t).
- Make sure the spacer sits flush against the hub. Any gap means it’s not seated properly.
- After installation, drive slowly for the first 50 miles, then re-torque the lugs.
- Get a wheel alignment after installing spacers. Even 5mm can change camber and toe slightly.
Never reuse old lug bolts if the spacer requires longer ones. Stock bolts are designed for a specific length. Too short = unsafe. Too long = they can hit the brake caliper or internal components.
Who Should Use Wheel Spacers?
Spacers aren’t for everyone. Here’s who benefits:
- Owners of aftermarket wheels that rub on suspension or fenders
- People who want a more aggressive stance without buying new wheels
- Enthusiasts on a budget testing out a look before investing
- Those restoring classic cars and needing to fit modern wheels
Here’s who should avoid them:
- Drivers with worn suspension or bearings
- People who drive off-road or on rough terrain
- Those planning to race or do track days with heavy lateral loads
- Anyone using spacers over 15mm without upgrading hubs or bearings
If you’re just looking to make your car look cooler and you’re willing to do it safely, spacers are a smart, affordable tool. But if you’re chasing extreme width without understanding the trade-offs, you’re asking for trouble.
Final Thoughts: A Tool, Not a Fix
Wheel spacers aren’t magic. They don’t turn a slow car into a fast one. They don’t fix bad alignment or worn parts. They’re a simple mechanical solution to a simple problem: wheel fitment.
Used correctly, they enhance safety, improve looks, and give you flexibility. Used poorly, they create vibrations, accelerate wear, and invite danger.
The key is knowing your car, knowing your limits, and choosing quality parts. A $200 set of hub-centric spacers from a trusted brand will serve you better than a $50 set from a random online seller. And always, always check clearance and torque.
At the end of the day, wheel spacers are like a pair of shoes - they need to fit right. Get the right size, install them properly, and they’ll work for you. Get it wrong, and you’ll be paying for it down the road.
Do wheel spacers affect fuel efficiency?
Not noticeably. The slight increase in aerodynamic drag from wider tires sticking out past the fender is minimal - usually less than 1% impact on fuel economy. For daily driving, you won’t see a difference on your odometer. But if you’re running massive spacers (20mm+) with oversized tires, you might lose a tiny bit of efficiency due to increased rolling resistance.
Can I stack two spacers together?
Technically yes, but it’s not recommended. Stacking spacers doubles the risk of misalignment, vibration, and bearing stress. Each spacer adds another point of potential failure. If you need 20mm of spacing, buy a single 20mm spacer made for your hub. Never use two 10mm spacers unless they’re specifically designed as a kit - and even then, it’s risky.
Will wheel spacers void my warranty?
It depends. Under the Magnuson-Moss Warranty Act in the U.S., a dealer can’t void your entire warranty just because you installed spacers. But if a wheel bearing or suspension part fails and they can prove the spacer caused it, they can deny that specific claim. Always keep receipts and installation records in case you need to prove proper installation.
Are aluminum spacers better than steel?
Aluminum is lighter and resists rust, which makes it better for most street applications. Steel is stronger and cheaper, but heavier and prone to corrosion. For daily drivers, aluminum is the standard. Steel is mostly used in off-road or heavy-duty applications where strength outweighs weight concerns. Always choose 6061-T6 aluminum - it’s the industry standard for strength and durability.
Do I need to get an alignment after installing spacers?
Yes. Even small spacers can change the toe and camber angles slightly. Over time, that leads to uneven tire wear and poor handling. A simple alignment check after installation takes 30 minutes and costs under $100. It’s the cheapest insurance you can buy for your tires and suspension.